The Clock Jobber's Handybook
By Paul N. Hasluck
Brought to you by:
Tick Tock Productions ™
The
CLOCK JOBBER'S HANDYBOOK.
PENDULUMS
THE CONTROLLERS.
CHAPTER V
EXAMINING AND CLEANING A 8-DAY CLOCK
Put the pin in the clock-plate, and cut it off the proper length with a pair of sharp cutting pliers. As there is danger of scratching the plates, even when using a pair of bevel cutting pliers, after making a good pin, learn to cut it off on the filing block. To do this, take a sharp knife, and after running the pin into the pillar tight, mark on each side a little cut. When taken out this will show on the burnished surface; then put it on your filing block, with the mark upwards, slightly deepen the cut nearest the pin vice with the sharp corner of your burnisher, put the same corner of the burnisher on the cut at the end, give the vice a twirl, and cut the superfluous part of the pin off. Then, holding the extreme point of the pin on the very edge of the file block, twirl it rapidly a few times, rounding off and finishing the point with a fine file and a burnisher. Then place the corner of the burnisher on the other mark and deepen the cut as you twirl the vice, holding the burnisher at an angle of about forty-five degrees with the pin. In this way, almost, but not quite, cut it off; put it back in the pillar, and give a slight bend, and the pin will break off, leaving the handsomely-finished pin in its proper place. Some people use the sliding tongs for holding the wire, but the pin-vice is to be preferred. After practising the use of the pin-vice so as to file a long taper pin adapted for movements, try making the sharper, stronger ones, with a more rounding point, adapted for brooch pins, finished with a burnisher, the points on the centre and not on one side of the pin. The next step is to see not only how well but how quickly these can be made without breaking, bending, or injuring tools or work.
The front plate will be ready for oiling as soon as the plates are pinned together. To make an " oiler," file up a piece of iron wire something like an examining pin, but about 4 in. long, and then flatten out the end like a drill. Good oil for clocks is prepared especially, and may be bought from any tool shops. Pour a little of the oil into some small vessel, and with the point of the oiler proceed to oil the pivots of the front plate by putting a little into each sink. A very little is sufficient, or it will flow over, and run down the plates, giving a very bad appearance. Slightly oil the studs upon which the rack and other parts work.
The cannon pinion spring may now be put on the centre arbor, and the cannon pinion and minute wheel in their places. The cannon pinion and minute wheel must work together in such a manner that the lifter falls exactly when the minute hand is upright; put the minute hand on the square of the cannon pinion, and see that it does so, or move the cannon pinion a few teeth in the minute wheel until right. The remainder of the dial work may now be put together. Observe that the hour wheel works into the minute wheel pinion, so that the hour hand is in its proper position when the clock strikes, and that the proportions and fall of the rack are correct. These are very important matters, and must be left exactly right, or the clock will be continually striking incorrectly. Judging from the large number of clocks with mutilated rack tails, it would seem very few clock repairers understand the proportion which should exist between the rack and rack tail.
To test the rack in its place, allow it to fall until the tail rests on the lowest step of the snail ; the rack hook should then hold the rack, so that there are twelve teeth to be gathered up ; then try it on the highest step — it should now exactly fit in the first rack tooth, leaving only that one to be gathered up. Supposing the clock strikes thirteen when on the lowest step and two when on the highest, it shows that the end of the rack tail is a little too far from the snail, and must accordingly be set a little closer. If it strikes twelve when on the lowest step, and two when on the highest, then the proportion between the rack and rack tail is wrong ; the travel of the rack tail being too great for the rack.
Suppose that a new rack tail has to be made, which is often necessary in badly used clocks. Measure _ with a pair of spring dividers the proper distance that the rack teeth fall for twelve to be struck by the clock, and mark that distance on a piece of paper, as shown A to B, Fig. 32 ; then take the distance from the points of the rack teeth to the centre of the stud, upon which the rack works, and mark that as shown A to C; Diagram showing then from B draw a straight line to C.
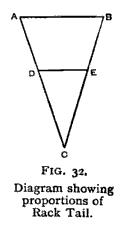
Take the total distance the rack tail has to fall — viz., from the top step of the snail to the lowest, and from where the two lines, A C and B C, are that distance apart, to the point, C, is the length required for the new rack tail. In the diagram the distance from the highest to the lowest drop of the snail is supposed to be from D to E, therefore the length of the rack tail would be from D to C.
When all the motion work is set right, pin on the dial and put on the hands. There should be sufficient tension in the spring under the cannon pinion for the hands to move tolerably tight, or the hands will stop when the minute wheel has to raise the lifter. It is always best to use a steel pin through the centre arbor to hold the hands on.
The clock is now turned over, and the pallets put in. It is necessary to put a very little oil on the pallets where they touch the escape wheel teeth, also on the pins of the pin-wheel, the acting portions of the hammer spring, and on the crutch. See that the hammer acts properly on the bell; screw on the seat board, and oil the pulleys from which the weights hang.
It now remains to put the clock in the case, and the following remarks may be useful. Fix the case as firm as circumstances will admit, then see that the seat board has a good bearing, that the dial is upright and does not lean either backward or forward, and that the crutch is free of the back of the case. Hang on the weights, and wind them up carefully, observing that the lines run properly on the barrels. It sometimes happens that the line is much longer than sufficient to .fill the barrel, and, when wound fully up, it interferes with the click work. The way to rectify this error is to put a piece of wire across the hole in the seat board in such a manner as to throw the line off as desired, so as to make a second layer on the barrel. Put on the pendulum, and set the clock "in beat".
The meaning of " in beat" is, that the escape takes place at equal distances each side of the pendulum's centre of gravity. When the pendulum is at rest, it should require to be moved as much to the right before you hear the " tick " as it does to the left, and vice versa. When " in beat " the tick sounds regular, and nearly equal, differences of the drop making it slightly uneven. The general rule for setting in beat is this : If the right-hand beat of the pendulum comes too quick, the bottom of the crutch requires bending to the right; if the left-hand beat comes too quick, then the crutch must be bent towards the left.
The clock may now be considered finished, and set going, with full assurance that it will give satisfactory results, and reflect credit upon its repairer. There will be no need to give the pendulum " a good swing " and hurry off before it can stop, as some so-called clock repairers often do, but just move the pendulum until the escape has taken place, then gently let it go. After regulating, the clock will indicate the time faithfully till it requires cleaning again. Regulation is effected by raising the pendulum-bob to make the clock go faster, and lowering it to make it go slower.
Having minutely explained the method of cleaning, examining and repairing the eight-day English clock, it will not be necessary to go into the same details with other kinds of clocks, but merely point out their peculiarities, it being understood that the same course of examining is to be pursued in every instance, and the repairs executed where needed in the manner already described.
_____________________________________________________________________________
Learn clock repair with these DVD courses! Course manuals are included.
Watch, study and learn antique clock repair through DVD course instruction using actual live repairs!!
Clock Repair 1 & 2 Advanced Clock Repair PRO advanced clock repair
Clockmaker Watchmaker Lathe Basics Clockmaker Watchmaker Lathe Projects Clock Case Repair & Restoration Wooden Works Movement Repair
© Copyright 2001-2009 by Tick Tock Productions © Copyright 2001-2009 by John Tope All rights reserved.
Back to clock information page.
Hasluck, Paul N. The Clock Jobber’s Handybook. London: Crosby Lockwood and Son, 1889.
This and the following pages are excerpts from the book.