The Clock Jobber's Handybook
By Paul N. Hasluck
Brought to you by:
Tick Tock Productions ™
The
CLOCK JOBBER'S HANDYBOOK.
CHAPTER VI
REPAIRING AN 8-DAY CLOCK
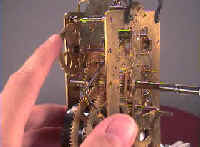
OLD-FASHIONED long-cased English eight-day clocks offer the best models on which to commence the study of practical horology. Although cumbersome when a removal is necessary, the immortalized " Grandfather's clock " is a piece of furniture which would adorn any hall or staircase.
Very few of the younger portion of the present generation have had opportunities of learning to repair these clocks thoroughly. Many clockmakers undertake the repairs of these clocks, but few are thoroughly and conscientiously repaired with a view to restore them to their original condition, retaining as much as possible of the old parts. When the clocks are relics, their owners generally desire this to be scrupulously attended to. If the clock be very old, most likely the repairs necessary to restore it to its original condition will be very heavy.
It is characteristic of these clocks, that if made in a manner only moderately accurate, and set going under conditions moderately favorable, when once started they will run themselves almost to pieces before they stop. The pivot holes, the pivots and pinions, and the pallets, will all be found to be badly cut and worn. It is but seldom a new pivot will require to be introduced, because, as a general thing, the original pivots were all left thick enough to allow them to be reduced and polished when worn.
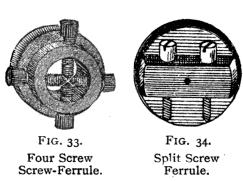
To "run " a pivot, which is badly cut and uneven, fix the turns in the vice, and put in a female centre at one end, and a running centre at the other. On previous pages are drawings of the turns, and some of the most frequently used centres. Secure a screw-ferrule, which may be like Fig. 33, or like Fig. 34, upon the sound end of the arbor, and, putting the point of the sound pivot in the female centre, adjust the position of the running centre, so that its groove receives the imperfect, pivot and allows it to have a good bearing. Put the gut of the cane bow round the ferrule in such a manner that the downstroke may cause it to revolve towards you; then, placing the plain edge of a fine file against the shoulder, file down the pivot until quite smooth and straight, taking care that with every downstroke of the bow the file is pushed away from you, and with the upstroke drawn towards you. Lastly burnish with a flat burnisher.
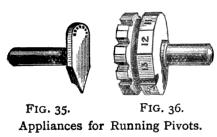
In this connection may be illustrated the attachment for filing and burnishing pivots furnished with the lathe illustrated on page 149, Fig. 96. The right-hand portion, Fig. 36, is a steel disc, having fourteen facets on its edge; each of these facets has a groove in which the pivot may rest, and the sizes of these grooves graduate to suit all sizes of pivots within the range. Fig. 35, on the left, is merely a piece to support the end of the arbor parallel to the grooves in Fig. 36. Though these two attachments belong to the lathe, yet they serve to illustrate how easily the same method of pivoting can be adapted to the ordinary turns by making the short cylindrical projections long enough and of suitable diameter to take the place of ordinary centres in the turn-bench.
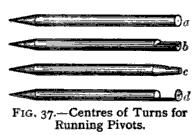
To put in a new clock pivot, the old one being broken off, file the end of the arbor quite flat, and make a slight depression exactly in the centre. Put on a screw-ferrule as before, and with a drill fitted into the centre, c, Fig. 37 proceed to drill a hole of suitable size and depth to hold the new Fig. 37. Centres of Turns for pivot . cause the arbor to revolve, "Running Pivots.' ' Keeping the drill tight up to the work, by which means the hole will be drilled straight and true with the centre mark. Draw file a piece of tempered steel to fit the hole nicely, and drive it in tight. Cut off to about" the required length and point it, so that the wheel and pinion run exactly true. Turn the pivot down with a graver to nearly the size, and then " run " it with a smooth file till quite right; burnish, and round up the end in the rounding up centre, d, Fig. 37. Should a new hole be necessary, put it in as previously directed.
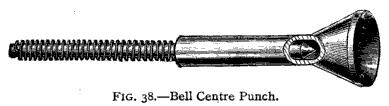
Should a new pivot be necessary, either from the effects of wear, or from being broken accidentally, any of the pinions will admit of a new one being inserted. If the new pivot has to be put at the end of the arbor where the pinion head is, it will be best not to soften the pinion. If at the other end, a small part of the arbor may be softened with impunity. If you have no lathe with a chuck that will take hold of the pinion to centre and bore the hole for the new pivot, you may centre it with a hollow drill, or by using a common drill, or a centre punch, always trying if the arbor and its pinion be true before you commence to bore. A bell centre punch, as shown at Fig. 38, is useful for centering large work.

Try the pinion in a pair of turns, with sharp centres, and centre the new pivot hole true. Care must be taken in this repair method not to take anything from the shoulder of the old pivot, because too much end-shake to the pinion will be the result. After the pinion is centred, if it cannot be bored in the lathe, fix a split collet on it and turn it with the drill bow, with the drill stationary Fig. 39.—Drill-Stock, in the vice. The best manner of making drills for such work was given in the " Watch JobBer's Handybook." Bore the hole well up, and thoroughly clean the oil and chips of steel out of it.
Ordinary drill stocks, for use with the drill-bow, are rods of steel with a ferrule near one end, which is pointed (see Fig.39.) The other end is bored up and a notch cut about half through the diameter to afford a hold for the drills. The drills are each first fitted to their stock, and then have their cutting edges formed. Any number of drills may be fitted to and used with one drill-stock. Stocks of different sizes are used according to the dimensions of the hole to be drilled. The usual sizes are from 3 to 4 inches in length, having ferrules from one-half to three-halves of an inch in diameter, and bored to take drills of from ,£$ to ^ of an inch in diameter. A much better form is that shown at Fig. 40, which has a wide ferrule, like a cotton-reel, and the end which takes the drills is an adjustable three-jaw chuck taking any size within the limits of its range. The pointed end of the drill-stock works in a centre punch mark on the end of the chops of the bench vice, and the tool is rotated with a drill-bow. An Archimedian drill-stock, as shown at Fig. 41, sometimes takes the place of the ordinary kind.
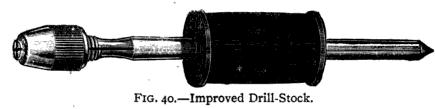

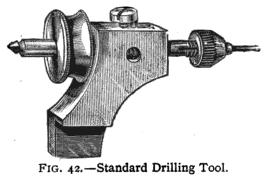
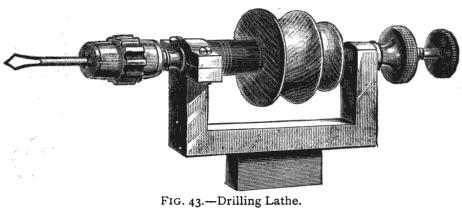
Fig 42 shows a more elaborate form of drill-stock, the construction of which is easy to see, and Fig. 43 is a drilling lathe, which can be held in the bench vice, or it is sometimes furnished with a wooden screw, projecting centrally from the bottom, by which it is screwed into the bench. Fit in the steel that is to make the new pivot very carefully, in such a manner that, when put in its place, one tap from a light hammer will send it home, tight enough for every pose. If fitted too tight, the arbor will be liable to be split; and if too loose, will not hold ; therefore, the necessity for fitting it with care in the first instance will be apparent. Should an arbor happen to get split, there is a remedy : put on a collar or ring over the split part, or solder the pivot in. Never solder a pivot unless as a last resource, and if you do solder it, always dip the soldered part in oil before it cools, to prevent rust from breaking out. The piece of steel from which the new pivot is to be formed being fastened in its place, the rest of the operation will be comparatively easy. Point the end of it in such a manner that the pinion arbor will run exactly true, then turn the new pivot to the desired size, polish it, and round off the end.
When the leaves of the clock pinions are badly cut, do not file the marks out, because filing will make the leaves too thin, and the pitching will be bad. It is better to shift the action of the clock wheels that work into the pinions. This is most easily accomplished by turning the necessary quantity off the shoulder of one of the pivots, and putting a raised bush in the plate at the opposite end to fit the pivot. By this repair method two actions can be shifted by one alteration, and it is always better than disturbing the wheels on their arbors. In old clocks they are usually fastened to collets soldered with hard solder.
_____________________________________________________________________________
Learn clock repair with these DVD courses! Course manuals are included.
Watch, study and learn antique clock repair through DVD course instruction using actual live repairs!!
Clock Repair 1 & 2 Advanced Clock Repair PRO advanced clock repair
Clockmaker Watchmaker Lathe Basics Clockmaker Watchmaker Lathe Projects Clock Case Repair & Restoration Wooden Works Movement Repair
© Copyright 2001-2009 by Tick Tock Productions © Copyright 2001-2009 by John Tope All rights reserved.
Back to clock information page.
Hasluck, Paul N. The Clock Jobber’s Handybook. London: Crosby Lockwood and Son, 1889.
This and the following pages are excerpts from the book.